RAF HARROWBEER
YELVERTON
Walk 1 ~ Knightstone Tea Room to Whistley
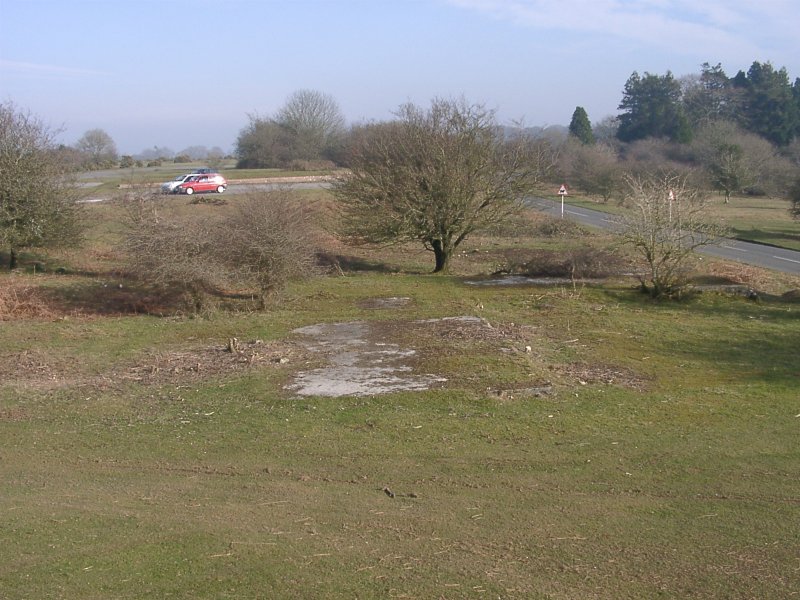
Park your car near to Knightstone Tea Room, (there is ample parking outside the Tea Room Car Park). The walk is on level ground, which shoud be fairly dry and easy to walk on. Take great care if climbing the Blast Bays (also know as Dispersal Pens) as they are quite steep. Before starting your walk, take a moment to look back across the cross road where you drove in (Picture 1).
N.B. when you
get to Whistley, please respect the privacy of the 'Brigadoon', which
is a private residence. We believe this was used as a 'sick bay' during
the Airfield's time. Several houses in the local area were taken over
for this use. The CO of the RAF Harrowbeer lived in a house called Brigadoon
which was (apparently) in Meavy Lane. No such house has this name today.
|
Map showing the route of Walk 1. |
 |
 |
Knightstone Tea Room is to the right. Planes crossed the road here to go down to Blister Hangars that were in the fields beyond. The area is now called Moorland Court and the hangars have been replaced by houses. Straight ahead of you in this view would have been the gun testing area. This was a wall with earth/sand in front of it. It was used for checking the aim of plane's wing guns |
|
Turn round to your right and Knightstone Tea Room is to your left. The Car Park is built across the former taxi-way to the end of runway 05/23. Traces of the taxi-way continue beyond the car park ahead of you. Walk around the wall and on to the first of the Blast Bays. The large house you see on your left, (now a nursing home) is Ravenscroft, RAF Harrowbeer's Officer's Mess. |
 |
 |
If you are feeling brave, carefully climb up onto the right-hand arm of the Blast Bay. Here you will note a curious figure-of-eight concrete structure. This is (we think) the base of a Bofors Anti-Aircraft Gun position. There is a better example further along which we shall see in a moment. Take a look at the size of the Blast Bay, note the 'pad' built into the side of the bay to your right here. |
|
There are six Blast Bays, (or dispersal pens) along this section. Bays were generally built in two sizes, one for fighters, one for Blenheim Bombers, (see the drawing on the technical info page). All the bays on this section are of the larger size. You should be able to pace about 25 steps from the tip of the arms to the centre arm, (approx 76 feet). Over near Yelverton, the bays are slightly smaller. Note that Bay 5 appears to have been demolished. This area was also affectionately known as 'Tiffy Corner' because of the Typhoon aircraft parked here |
|
|
From your vantage point here, look across to your left. The curved section of road around the tree was a Tanker Stand. A refuelling Bowser would have stood here ready to refuel any aircraft that came into the nearby Blast Bays. You will spot another of these when you get further around the corner, between Bays 4 and 5. Climb down and walk past the next bay, until you reach a clump of trees. |
 |
 |
Hidden in these trees are some Hut Bases. These are the bases of Flight Office 'CK'. It's hard to imagine pilots sitting on chairs outside this hut, waiting for a 'scramble'. This view is taken from behind the trees showing the back of the hut base. Just to the right here is the drying room, where kit could be left to dry. |
|
Continue walking away from Knightstone. On the top of the left hand arm of the third bay, there is a better example of the Bofors Gun Position. Note the pipe in the front circle. This would have had the gun sitting on it. Climb down carefully and walk to the next Blast Bay. |
 |
 |
This depression alongside bay 4, is an M & E Plinth. Basically this was were the electric circuits for the surrounding airfield buildings/bays etc, came in. The airfield had several independant electric circuits, so that if one was hit, it didn't effect the others. Continue walking to bay 5. There was an air raid shelter to the left of bay 5 but it has been demolished. You should be able to spot the Tanker Stand here as well! |
|
As you walk towards bay 6, note the remains of a path leading down to the left. This leads to the the Hut Bases of Flight Office 'DK' together with its drying room, (back right). This view is from the top of bay 6, looking back the way we came. |
 |
 |
Take a moment to study the Blast Bay. Each bay has two arms and a central divider. On each side there is a (now bricked up) entrance to an internal air raid shelter for 25 men. At the back of the bay, you will spot a similar brick structure. This was an emergency exit. Each bay has a concrete pad in it. Typhoon aircraft were notorious (apparently) for dripping oil which ate into tarmac, hence the concrete! |
|
This is the end (for now) of Walk 1 as we have reached Whistley. Retrace your steps back towards Knightstone. Incidentally, the road in front of the bays on which you are walking, is the original road from the A386 to Crapstone. The RAF built the new 'main' road when they took over the land. The large houses behind the airfield had long driveways that came out to this road. |